 Skip to content


Back in the day, you proudly stood with your pinball brethren, arrogantly blaring your 50s midi tunes and yelling MOVE YOUR CAR to all who would listen. The back seat was smooch central, and the snack bar stayed open all night. People would line up to play you, pumping in coins like it was going out of fashion. You were a king among kings. The good times were rollin, you thought they'd never stop.
Then the rains came.

CREATURE FROM THE BLACK LAGOON EBAY PROJECT
In a matter of days, you had become worthless. Just one more waterlogged asset to liquidate with the rest. You moved from one damp shed to the next, slowly rotting, rusting, disintegrating. Forever cursed to dream of the good ol days when your parts moved with purpose. When you were an 'amusement' for all the right reasons.

Yet even in the midst of despair, a small fire burned within you. A small flicker of hope that one day you find a big enough idiot who believed that every machine deserved a second chance. Some foolhardy imbecile who didn't understand the task ahead of him. Who didn't appreciate the level of investment required or the basic properties of rust.
This is the story of that idiot.
Here at Stumblor Pinball we love a challenge. Good thing too - because this creech was the mother of all challenges. Rusted playfield mechs, broken screws, missing (and hard to find) parts, delaminated cabinet. Whew! It's making me tired just remembering the state it was in before we started work.
Before we tackled the travesty that was the cabinet, the playfield needed to be cleared.

There is one, very important lesson when disassembling a pinball machine. A mistake you only make once, and we've all done it. TAKE PICTURES. Lots of pictures. You think that one picture you took is enough? It probably isn't. Take another one! From a different angle! You can never have too many pictures when you're trying to solve a problem later on.
Most of the lamp holders were toast, and about 50 screws broke being removed. Although most of the mechs were salvageable, the playfield was never going to be useable, so instead we acquired a decent second hand one. Creature playfields come in two different colour varieties, due to being made in two separate factories at the time. The first version is the more sought after 'hot pink', the second being a more 'light pink'. It is this second one we obtained, the one I prefer.
CFTBL HOT PINK VS LIGHT PINK
Topside, things became even tricker, with most of the posts refused to budge. Most of these would have to be replaced, along with all the plastics which were warped, yellow, and broken.

After everything top and bottom was removed, tallied and baggied, everything that could be was sent off to the zinc plater. This included things like the underside mechs, brackets, the backbox PCB plate. Legs, leg bolts, cabinet armour and backbox hinges, wire ramps, apron and shooter gauge are off to the powder coater (we have something very special in store for them). Everything else, like screws, washers, and smaller parts, are into the tumbler with some walnut media for a few days to get polished up. All the ball habit rails will need to be polished by hand, using a flap disc sander in my cordless drill.
Now time to tackle that awful cabinet!
Pinballs are usually stored in a configuration known as a 'tombstone' which basically means folded upright. Because the rear of the cabinet is closest to the ground, it is the first thing that suffers from damp damage. And it was no different here - the f the cabinet was completely delaminated and in a shocking state. Likewise the cabinet bottom. It was all going to have to be replaced.
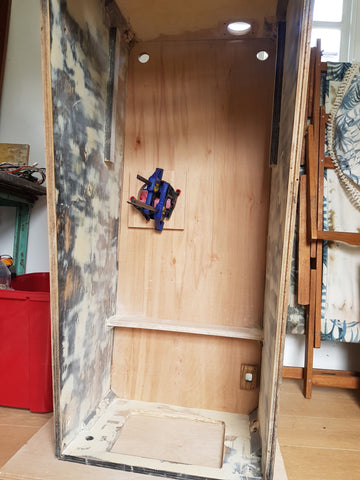
To remove the bottom of a pinball cabinet, the easiest approach is to first remove the front of the cabinet (where the coin door is). It is secured to the side panels using nails, so can be removed by carefully tapping it forward from the inside of the cabinet. One it comes away, the bottom of the cabinet will then slide out. Using the original bottom as a template, cut a new piece of 12mm ply the same shape, router out the edge channels, and use a hole cutter to remove the sections for the sub, power switch, and air vents. Glue and pin this in place, clamp until dry, and then replace the front panel.
Once the cabinet was sound, it was time to start dealing with all the bumps and lumps. Nothing fancy about this process, it's simply a case of using auto filler and sanding. And repeat. And repeat. AND REPEAT. Until you can no longer feel any bumps with you hand.
Edges should be strengthened using fibreglass resin.


CFTBL ZINC PLATING PINBALL PARTS
Once all the shiny new bits have arrived (not to mention the always exciting parcels of parts from all over the world) it's time to start reassembly.


CFTBL REASSEMBLING THE PLAYFIELD
Creech is starting to look like himself again! This is the fun bit where all that hard work starts to pay off.
Below is a run down of all the parts that went into this project.
* WPC 89 Driver Board (Rottendog) (A-12697-1)
* WPC 89 CPU Board (A-12742) (Rottendog)
* Processor chip
* DMD controller board
* Hologram shield
* Sound Board (A-12738)
* Pin2DMD
* Upgraded speakers and sub
* 2 x Flipper Opto Assembly (Type 1)
* Fliptronic II Board (A-15472)
* Coin door interface board (A-14102)
* Service buttons
* Backglass (CPR mirrored)
* Backglass trims
* Backbox latch
* Planetary Pinball cabinet decals (PPS)
* New playfield plastics
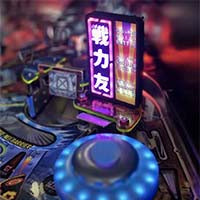
* Backbox warning screen
* New ramps
* Transparent rubbers, cliffy post rubbers
* Titan UV flipper rubbers
* Cliffy protectors
* Flippers
* Switches
* Lamp sockets
* Transformer
* Cabinet wire looms
* Speaker grills
* Speaker panel (CPR mirrored)
* Comet Pinball LEDs (mostly ice blue and pink, and some matrix strip lighting)
* Speaker panel latches
* Tilt & Slam tilt assemblies
* Rainbow ribbon cables
* 2 x Flipper rebuilds
* Hologram lamp upgrade
* New repro hologram (Henrik Best of Pinball)
* Playfield window & decals
* Mirror blades
* Afterglow GI
* Afterglow Nano
* Stumblor "Chase Echo" replacement chase board
* Stumblor "Move you Snackbar" lighting mod
* Stumblor "The Rippler" lighting mod
* Swinks snackbar mod
* Tech and fuse charts, laminated
* Apron decals (glow in the dark neon green)
* Backboard decal (glow in the dark neon green)
* Service & warning decals
* Rule cards
* Ground braid
* Invisiglass
* Transparent pop bumper bodies and skirts
* Pop rings
* Teal pop caps and lane guides
* Teal posts, slingshot post lights
* Outhole lighting (comet matrix UV)
* Coin door
* Prismatic powder coated armour
* Zinc plated mechs
* Creature from the Black Lagoon lego minifig keyring
